

The ten finish problems vehicle owners encounter most are clearcoat peeling and delamination, scratches and chips, fading and oxidation, rust and corrosion, water spots and etching, bubbling and blistering, orange peel texture, runs and sags, contamination from bird droppings, tree sap, and acid rain, and fisheyes or pinholes. Each one follows a predictable pattern: a root cause, visible symptoms, and a window of opportunity to act before the damage compounds. Knowing which problem you’re looking at is the first step toward protecting your car’s paint before a minor defect becomes a costly repair.
Immediate actions when you spot a finish problem:
- Do photograph the defect in natural daylight from multiple angles before touching it.
- Do apply a temporary cover or painter’s tape around a chip if primer or bare metal is exposed.
- Do consult a body shop or professional studio if you see rust, spreading delamination, or any area where the substrate is exposed.
- Don’t attempt aggressive machine polishing or sanding on a panel where the clearcoat is already lifting or flaking.
Key Takeaways
The most important principle in managing car finish issues is this: defects caught at the clearcoat stage cost a fraction of what they cost once rust, delamination, or substrate exposure sets in.
| Point | Details |
|---|---|
| Inspect and photograph first | Document defects in natural light before touching them; photos support estimates and warranty claims. |
| Address chips immediately | A chip that reaches bare metal must be sealed with touch-up paint the same day to prevent rust from spreading laterally. |
| Remove contaminants fast | Bird droppings, tree sap, and acid rain can etch through clearcoat within hours in warm weather. |
| Match the repair to the depth | Surface-only scratches are DIY-manageable; anything reaching primer, metal, or showing delamination requires a professional. |
| Mannyceramicprotouch for prevention | Liquid PPF and ceramic coatings applied before damage occurs reduce the frequency and severity of most common finish defects. |
Table of Contents
- How do you quickly identify which finish defect you’re looking at?
- A card-by-card breakdown of every common paint defect
- Which finish problems can you safely fix at home?
- What does a practical maintenance routine actually look like?
- What do repairs actually cost and how long do they take?
- How do ceramic coatings and PPF change your finish-problem risk?
- Mannyceramicprotouch can protect your vehicle before problems start
- A studio perspective on inspection and protection priorities
- Sources
How do you quickly identify which finish defect you’re looking at?
Matching a symptom to the right defect saves time and prevents the wrong repair from making things worse. The table below maps the most common visual symptoms to their likely cause and the appropriate first response.
| Symptom | Likely defect | First response |
|---|---|---|
| Flaking or peeling sheets of clear film | Clearcoat delamination | Do not polish; consult a pro |
| Brown or orange discoloration under paint | Rust/corrosion | Photograph, cover, see a shop |
| Dull, chalky, powdery surface | Oxidation/chalking | Clay bar, light polish, or pro correction |
| Bubbles or pimples under paint | Blistering | Do not pop; assess moisture source |
| Textured surface like an orange skin | Orange peel | Machine polish (if clearcoat is intact) |
| Paint drips or thick ridges | Runs and sags | Wet-sand carefully or consult a pro |
| Crater-like pits in fresh paint | Fisheyes/pinholes | Spot repair; address contamination source |
| Swirl marks or haze after polishing | Sanding/polishing marks | Refine with finer compound or pad |
| Staining or etching in clearcoat | Contamination (sap, droppings) | Clay bar, chemical decontamination |
| Wavy or lifted edges near panel seams | Edge mapping/lifting | Pro assessment; do not peel |
Photo-capture tips for accurate remote estimates
Good photos can determine whether a shop needs to see the vehicle in person or can give a reliable remote estimate. Shoot in indirect natural light, ideally on an overcast day, to avoid glare that hides depth. Take one close-up shot (6–8 inches from the defect) and one context shot showing the full panel. Place a coin or small ruler next to chips and scratches so depth and size are clear. For delamination or blistering, a side-angle shot at roughly 30 degrees reveals whether the edges are lifting.
When a photo is enough: surface scratches, light water spots, minor chips, and oxidation on a single panel can usually be estimated remotely from clear photos.
When the shop needs to see the car: spreading delamination, any area with suspected rust underneath, bubbling near seams or wheel arches, and multi-panel damage all require a hands-on assessment. Research on automated defect-detection systems confirms that visual inspection quality directly affects diagnostic accuracy, even in controlled industrial settings.
Pro Tip: Shoot a short video while slowly moving a flashlight or phone torch across the panel in a dark garage. The raking light reveals texture defects like orange peel, sanding marks, and shallow scratches that flat daylight photos miss entirely.
A card-by-card breakdown of every common paint defect
The Sherwin-Williams Troubleshooting Guide catalogs more than 30 coating defects, each with a documented cause and prevention path. The defects below cover the full range owners and enthusiasts are most likely to encounter.
Clearcoat delamination and peeling
What it looks like: Sheets or flakes of transparent film lifting away from the color layer, often starting at edges, door handles, or roof panels.
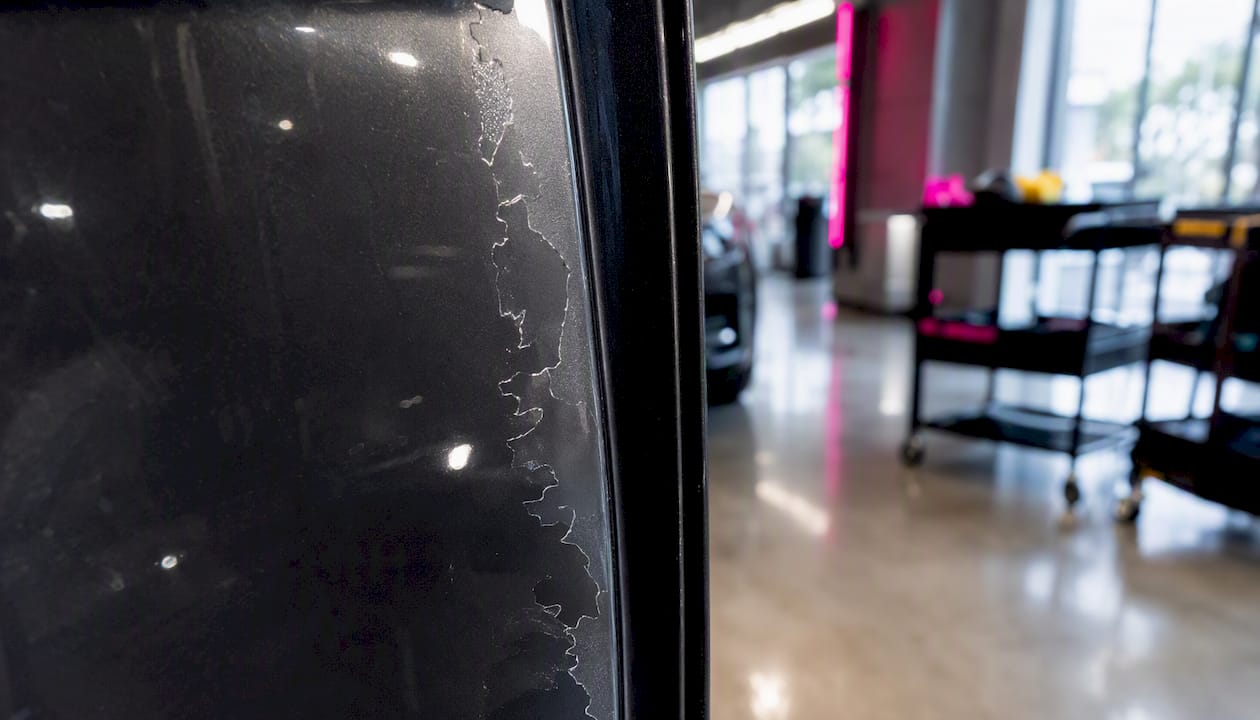
Causes: UV degradation over time, factory application defects, or incompatible repair materials applied over the original clearcoat.
Immediate owner action: Do not attempt to buff or polish the area. Polishing a failing clearcoat accelerates flaking and can expose the basecoat to UV and moisture damage faster. Cover the panel if possible.
Prevention: Park in covered or shaded areas, apply a UV-blocking ceramic coating or paint protection film, and inspect roof and hood panels annually.
Repair: Always professional. The panel must be stripped to the substrate and repainted. No DIY product restores a delaminating clearcoat.
Rust and corrosion
What it looks like: Brown or orange staining visible through the paint, bubbling near panel seams, or a rough texture where the metal has oxidized beneath the surface.
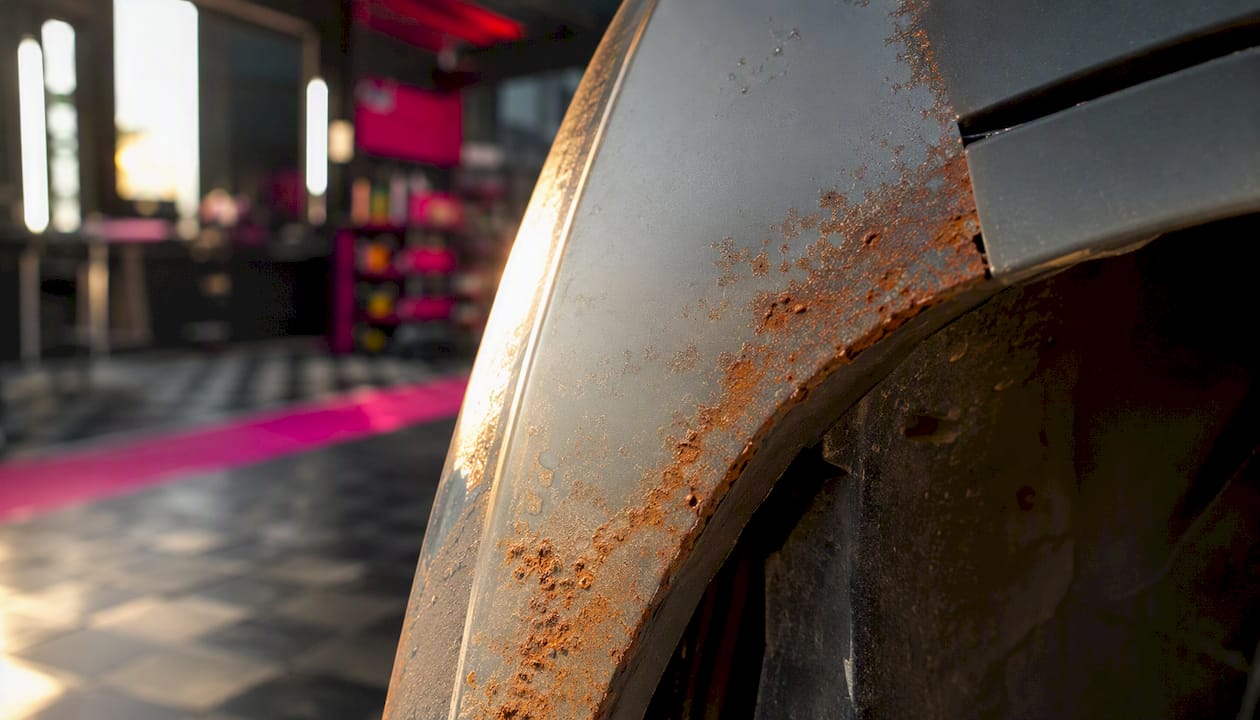
Causes: Chips or scratches that reach bare metal, road salt, and moisture intrusion at seams or drain holes.
Immediate owner action: Photograph the area and apply a temporary chip touch-up pen to seal the metal from moisture. Do not delay; rust spreads laterally under intact paint.
Prevention: Address chips promptly, rinse the undercarriage after driving in salted conditions, and keep drain holes clear.
Repair: Surface rust caught early can be treated with a rust converter and spot repaint. Structural rust requires panel replacement and is always a professional job.
Fading, oxidation, and clearcoat yellowing
What it looks like: A dull, chalky, or milky appearance on horizontal panels (hood, roof, trunk lid), sometimes with a yellowish cast on white or light-colored vehicles.
Causes: Prolonged UV exposure breaks down the clearcoat’s resin binders. The PPG common paint defects guide identifies UV degradation and inadequate UV-inhibitor content in the original coating as primary drivers.
Immediate owner action: Wash and clay-bar the panel to remove surface contamination before assessing true oxidation depth. Light oxidation often responds to a quality polish.
Prevention: Apply a UV-blocking wax, sealant, or ceramic coating. Covered parking reduces UV exposure significantly. For detailed guidance on preventing paint fading, a consistent maintenance routine is the most reliable defense.
Repair: Light oxidation: machine polish with a cutting compound. Moderate to severe: professional paint correction. Yellowed clearcoat that has lost adhesion requires a full respray.
Scratches and chips
What it looks like: Linear marks ranging from hairline swirls in the clearcoat to deep gouges exposing primer or metal. Chips appear as small craters, typically on the hood, front bumper, and leading edges.
Causes: Road debris, improper washing technique, automatic car washes with abrasive brushes, and keying.
Immediate owner action: Clean the area and apply a paint pen or touch-up paint matched to the vehicle’s color code if primer or metal is visible. This is a temporary seal, not a cosmetic fix.
Prevention: Use a two-bucket wash method, microfiber wash mitts, and avoid automatic brush washes. A paint protection film on high-impact zones prevents chips from reaching the paint.
Repair: Clearcoat-only scratches: machine polish. Scratches through to primer or metal: professional spot repair or panel respray. Quick remediation prevents spread and keeps repair costs lower.
Bubbling and blistering
What it looks like: Small raised domes or larger bubbles under the paint surface, often appearing near panel seams, wheel arches, or areas with trapped moisture.
Causes: Moisture trapped between paint layers, solvent entrapment during application, or contamination on the substrate before painting. The Sherwin-Williams Coating Excellence Guide identifies incompatible materials and improper flash times as common application-stage causes.
Immediate owner action: Do not puncture or pop blisters. Moisture trapped inside can accelerate corrosion if the substrate is exposed. Photograph and consult a shop.
Prevention: Proper surface prep before any paint application, correct thinner ratios, and adequate flash times between coats.
Repair: Always professional. Blistering indicates a systemic failure of adhesion between layers and requires stripping back to the source of contamination.
Orange peel
What it looks like: A textured surface resembling the skin of an orange, visible under raking light or a paint inspection lamp. The paint is intact but lacks a flat, mirror-like finish.
Causes: Paint applied too thick, incorrect spray pressure, too-fast evaporation of solvent, or insufficient flow additives. Common in factory paint and DIY respray work.
Immediate owner action: No urgency; orange peel is a cosmetic issue, not a structural one. Assess whether the clearcoat is thick enough to wet-sand safely.
Prevention: Proper spray technique, correct reducer selection for ambient temperature, and adequate film build.
Repair: Wet-sanding with 1500–2000 grit followed by machine polishing can level orange peel if clearcoat thickness allows. A paint depth gauge before sanding is advisable.
Runs and sags
What it looks like: Thick drips or curtain-like ridges of paint that have flowed downward before curing, most visible on vertical panels.
Causes: Too much paint applied in a single pass, incorrect reducer, or spraying too close to the panel.
Immediate owner action: Allow the paint to cure fully before attempting any correction. Wet-sanding a run before it hardens creates a larger repair area.
Prevention: Proper spray technique, correct gun settings, and applying multiple thin coats rather than one heavy pass.
Repair: Fully cured runs can be carefully wet-sanded and polished. Severe runs that reach into the basecoat require professional blending or a panel respray.
Contamination: bird droppings, tree sap, and acid rain
What it looks like: Etched craters, staining, or raised deposits on the clearcoat surface. Bird dropping damage often appears as a circular etch with a slightly raised center. Acid rain leaves a pattern of small, shallow pits across horizontal panels.
Causes: Bird droppings and tree sap are chemically acidic or resinous and etch into clearcoat if left in contact with the surface. These contaminants can chemically etch or stain finishes within hours in hot weather. Acid rain deposits sulfuric and nitric acids that react with the clearcoat’s resin.
Immediate owner action: Remove bird droppings and sap as quickly as possible using a dedicated detailing spray and a soft microfiber cloth. Never scrub dry. For deeper etching, a clay bar followed by a light polish is the next step. More detail on top contaminants harming car paint is available for owners dealing with recurring exposure.
Prevention: Ceramic coatings and PPF create a sacrificial barrier that resists chemical etching. Covered parking and prompt cleaning are the most effective behavioral defenses.
Repair: Light etching: polish and re-seal. Deep etching that has penetrated through the clearcoat: professional spot repair or panel correction.
Fisheyes, pinholes, and solvent pop
What it looks like: Fisheyes appear as small circular craters with a raised edge in fresh or newly repaired paint. Pinholes are tiny punctures through the paint film. Solvent pop creates small bubbles that burst and leave pits as trapped solvent escapes during curing.
Causes: Silicone contamination on the substrate (from polish, wax, or spray products), moisture in the air supply, or solvent evaporating too quickly before the paint film skins over.
Immediate owner action: These defects appear during or immediately after a paint application. If you notice them during a DIY respray, stop and allow the coat to cure before assessing the extent.
Prevention: Thorough surface decontamination before painting, using a wax-and-grease remover, and ensuring the spray environment is clean and dry.
Repair: Light fisheyes can sometimes be sanded and recoated. Severe contamination usually requires stripping the affected area and starting over.
Sanding and polishing marks
What it looks like: Circular swirl patterns, haze, or visible scratch lines in the clearcoat, most apparent in direct sunlight or under a paint inspection lamp.
Causes: Using too-coarse an abrasive for the clearcoat hardness, incorrect pad selection, or polishing with a contaminated pad.
Immediate owner action: Refine with a finer compound and a clean foam finishing pad. Do not apply wax or sealant over visible swirls, as the coating will lock them in.
Prevention: Always work through a proper abrasive sequence (coarse to fine), keep pads clean, and finish with a dedicated finishing polish before sealing.
Repair: Light swirls: one-step finishing polish. Deep sanding marks: professional paint correction with a dual-action or rotary polisher.
Edge mapping, lifting, and wrinkling
What it looks like: Wrinkling or lifting at panel edges, door jambs, or where a new coat was applied over an existing one. Edge mapping shows as a visible outline of the repair area telegraphing through the new paint.
Causes: Applying a new coat over incompatible or uncured paint, using too strong a solvent that attacks the underlying layer, or insufficient feathering of the repair edges.
Immediate owner action: Do not attempt to peel or sand lifting edges. Consult a professional to assess whether the underlying layer needs to be stripped.
Prevention: Proper surface prep, compatible materials, and correct feathering technique at repair edges.
Repair: Always professional. Lifting and wrinkling indicate a systemic adhesion failure between layers.
Pro Tip: Before any DIY polishing or sanding, use a paint depth gauge to measure clearcoat thickness. Panels that have been resprayed previously may have very little clearcoat remaining, and sanding through to the basecoat creates a repair far more expensive than the original defect.
Which finish problems can you safely fix at home?
The decision between DIY and professional repair comes down to one question: has the damage reached primer or bare metal? Surface-only defects are generally DIY-manageable with the right tools. Anything that has penetrated the clearcoat and basecoat warrants a professional assessment.
DIY-suitable conditions
- Clearcoat-only scratches (a fingernail does not catch in the scratch)
- Light water spots and surface contamination
- Minor oxidation on a single panel
- Orange peel on a panel with adequate clearcoat thickness
- Small chips where touch-up paint can seal the metal temporarily
Pro-required conditions
- Any area where primer or bare metal is visible
- Spreading or lifting delamination
- Bubbling or blistering near seams (moisture and corrosion risk)
- Rust visible under or through the paint
- Edge lifting or wrinkling after a previous repair
- Multi-panel damage or color-match requirements across adjacent panels
Decision flow for owners
- Photograph the defect in natural light and assess depth with a fingernail test.
- If the scratch catches your fingernail, it has penetrated the clearcoat; if it does not, it is surface-level.
- Apply temporary protection (touch-up pen, cover) if primer or metal is exposed.
- For surface-only defects with the right tools (dual-action polisher, quality compound, microfiber pads), proceed with DIY correction. A guide to correcting minor paint flaws covers the process in detail.
- For anything deeper, get estimates from at least two reputable shops.
Questions to ask a body shop
- What prep steps do you include before painting (sanding grit levels, degreasing, corrosion treatment)?
- How do you match the color (spectrophotometer, tinted blend, or panel respray)?
- Does the repair warranty cover clearcoat adhesion failure?
- Will you treat any corrosion found under the paint before repainting?
- Is the repair blended into adjacent panels to avoid a visible color boundary?
Consumer Reports data shows that some models have notably higher rates of bubbling, peeling, and flaking, and recommends documenting problems and working with dealers or body shops, particularly for vehicles still under warranty.
What does a practical maintenance routine actually look like?
Prevention costs far less than repair. A consistent routine addresses the root causes of most common finish issues before they become visible defects.
Weekly habits
- Wash with the two-bucket method using a pH-neutral shampoo and a clean microfiber wash mitt.
- Dry with a clean waffle-weave drying towel or a forced-air blower; never let water air-dry on the paint.
- Remove bird droppings, tree sap, and insect residue immediately. In warm weather, these contaminants can etch into clearcoat within a few hours.
- Avoid automatic tunnel washes with rotating brushes; they introduce swirl marks and can lift edges on previously repaired panels.
Monthly checks
- Inspect high-exposure panels (hood, roof, front bumper, door edges) under raking light for new chips, scratches, or early oxidation.
- Clay-bar any panel that feels rough or gritty after washing; bonded contamination accelerates clearcoat degradation.
- Top up a spray sealant or ceramic coating booster if the water-beading behavior has noticeably declined.
Seasonal and annual care
- Once or twice a year, have a professional inspect the paint for early delamination, corrosion at seams, and clearcoat integrity. Catching these issues early keeps repair costs manageable.
- Apply a corrective polish if oxidation is appearing on horizontal panels. Do not wait until the clearcoat has chalked through.
- Reapply a sacrificial protection layer: a quality carnauba wax, a synthetic paint sealant, or a ceramic coating booster, depending on what the vehicle currently carries.
Parking and storage
- Covered or garaged parking reduces UV exposure, acid rain contact, and sap/bird dropping accumulation more than any product.
- Avoid parking under trees, near sprinkler systems (hard water spots), or in areas with heavy industrial fallout.
- If outdoor storage is unavoidable, a breathable car cover provides meaningful protection against UV and contamination. Understanding the full range of environmental threats to automotive finishes helps owners make smarter parking and storage decisions.
What do repairs actually cost and how long do they take?
Repair costs vary widely based on defect depth, panel size, color complexity, and shop labor rates. The ranges below reflect typical U.S. market conditions and are intended as planning benchmarks, not fixed quotes.
| Repair type | Typical timeframe | Key cost drivers |
|---|---|---|
| Touch-up chip (paint pen or spot fill) | 1–3 hours | Color match accuracy, number of chips |
| Spot repair / blend (single panel) | 1–2 days | Basecoat vs. clearcoat only, blending adjacent panels |
| Full panel respray | 2–5 days | Color complexity, metallic/multi-stage, prep labor |
| Clearcoat delamination (panel strip and repaint) | 3–5 days | Number of panels, substrate condition |
| Corrosion repair with metalwork | Several days to weeks | Extent of rust, panel replacement vs. repair |
What drives cost most
- Depth of damage: Clearcoat-only repairs cost significantly less than repairs that reach the basecoat, primer, or metal substrate.
- Color complexity: Solid colors are the least expensive to match. Metallic, pearl, and multi-stage finishes require more passes and more precise blending.
- Prep work: Rust removal, panel straightening, and corrosion treatment add labor hours that dwarf the painting cost itself.
- Labor rates: U.S. body shop labor rates vary by region and shop tier; luxury and specialty shops typically charge more per hour but often deliver better color-match results.
- OEM parts: If a panel requires replacement rather than repair, OEM versus aftermarket pricing affects the total significantly.
Insurance considerations
Involve your insurer when repair costs exceed your deductible by a meaningful margin, or when the damage resulted from a covered event (collision, hail, vandalism). For small cosmetic repairs, filing a claim can raise premiums over the following policy period, making out-of-pocket payment the smarter financial choice for minor defects. Document all damage with timestamped photos before any repair begins; this protects you in a claim dispute and supports a warranty conversation with the shop.
What a reputable shop estimate should include:
- Prep steps (sanding grit sequence, degreasing, corrosion treatment)
- Color-match method (spectrophotometer reading, tinted blend, or full panel respray)
- Whether adjacent panels will be blended
- Warranty terms covering clearcoat adhesion and color match
- Corrosion treatment if rust is present
How do ceramic coatings and PPF change your finish-problem risk?
Professional surface protection does not make paint impervious, but it meaningfully changes the frequency and severity of most common finish problems. Ceramic coatings form a semi-permanent layer of silicon dioxide over the clearcoat, providing chemical resistance, UV inhibition, and hydrophobicity. Paint protection film (PPF) and Liquid PPF add a physical sacrificial layer that absorbs rock chip impacts and resists abrasion.
Correct root-cause identification is critical: many surface problems are symptoms of oxidation, contamination, or poor application rather than isolated cosmetic issues. Treating the root cause preserves both appearance and protective function. — Sherwin-Williams Troubleshooting Guide
What coatings actually protect against
- UV-driven fading and clearcoat yellowing (ceramic coatings with UV inhibitors slow this process on coated panels)
- Chemical etching from bird droppings, tree sap, and acid rain (the coating takes the chemical attack instead of the clearcoat)
- Light abrasion and swirl marks from washing (a properly applied ceramic coating is harder than clearcoat)
- Rock chip penetration to primer or metal (PPF and Liquid PPF absorb impact energy that would otherwise chip through to the substrate)
What coatings do not prevent
- Deep chips or gouges that exceed the film’s thickness
- Corrosion that originates at an unprotected seam, drain hole, or pre-existing chip
- Delamination of the underlying paint system if the original clearcoat had adhesion issues before the coating was applied
How coatings change inspection and repair decisions
A coated vehicle requires a different approach at the shop. Technicians need to know what coating is present before any abrasive correction, because polishing through a ceramic coating into the clearcoat changes the repair sequence. Liquid PPF, in particular, can be spot-repaired in some cases without disturbing the underlying paint. For owners of luxury or high-value vehicles, understanding how ceramic coating enhances your vehicle’s appearance and its long-term preservation role is part of making an informed protection decision.
Mannyceramicprotouch can protect your vehicle before problems start
When a finish problem reaches primer or bare metal, the repair cost climbs fast. The more cost-effective path is professional protection applied before damage occurs.

Mannyceramicprotouch specializes in Liquid PPF and high-performance ceramic coatings for luxury, exotic, and high-value vehicles. The studio’s quality-first process covers every panel with a tailored protection strategy, addressing the specific exposure risks of each vehicle rather than applying a one-size approach. Services include paint correction to address existing defects before coating, Liquid PPF for chip and abrasion resistance, ceramic coatings for chemical and UV protection, and maintenance plans to keep the protection performing over time. Every vehicle receives a thorough pre-application inspection to identify any existing finish issues before they are sealed under a coating layer.
To protect your vehicle’s finish before the next chip, etch, or oxidation cycle begins, request a quote or book an inspection with Mannyceramicprotouch today.
A studio perspective on inspection and protection priorities
At Mannyceramicprotouch, the first step in any vehicle assessment is identifying substrate exposure. Before any coating or correction work begins, the inspection focuses on three questions: Is the clearcoat intact and adhering properly? Is there any corrosion at panel seams, drain points, or previous repair edges? And has any prior repair work created adhesion incompatibilities that would affect how a new protective layer bonds?
Most finish failures that reach a studio at a significant repair cost started as something small: a chip left unsealed, a bird dropping left on the hood for a week in Florida heat, or a clearcoat that was polished when it should have been stripped. The pattern is consistent. Early intervention, whether that means a same-day chip seal or a professional paint correction before applying a ceramic coating, changes the long-term outcome for the vehicle’s finish.
Coating and PPF choices factor directly into long-term preservation. A vehicle protected with Liquid PPF before chips occur does not face the same corrosion risk as one where chips are sealed reactively with touch-up paint. The protection layer is the difference between managing a finish and preserving it.
Sources
The sources below were used to build this guide and are worth consulting directly for deeper technical detail.
- Troubleshooting Guide
- Common paint defects guide
- What Damages Car Paint: A Definitive Breakdown
- Cars most likely to have paint problems
- 7 Common Car Paint Problems and How to Fix Them Before They Get Worse